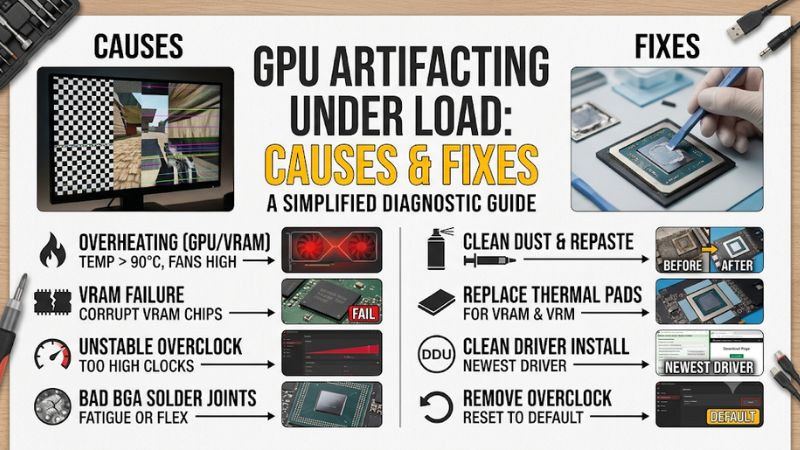
GPU artifacting under load can indicate unstable graphics memory, excessive temperatures, insufficient power delivery, or a software problem. Colorful squares, flashing textures, distorted polygons, and strange lines are common warning signs. Identifying when these visual errors appear helps distinguish driver problems from potential GPU hardware failure before replacing expensive components.
Why GPU Artifacting Under Load Happens
GPU artifacting under load occurs when the graphics pipeline produces or displays corrupted visual information during demanding workloads. Gaming, rendering, and stress testing can expose instability that remains hidden on the desktop. However, artifacts do not automatically mean the graphics card is failing. Temperature, memory stability, power delivery, drivers, and display connections must be investigated separately.
1. Unstable VRAM or GPU Memory
Video memory (VRAM) stores textures, frame buffers, geometry data, and other information required to render graphics. When memory becomes unstable, the GPU may process incorrect data, producing colored blocks, unusual patterns, missing textures, or flashing pixels. These problems can become more noticeable during demanding games with high-resolution textures.
Memory instability can result from an aggressive memory overclock, an undervolt that reduces stability, excessive temperatures, or deteriorating hardware. Even a configuration that previously worked may become unreliable under different workloads. A game using more VRAM or a different memory access pattern can expose problems that lighter applications never trigger.
If artifacts disappear after returning memory settings to their original values, the previous configuration was likely unstable. However, this does not establish whether the underlying problem is software tuning, temperature, or physical memory degradation.
2. GPU Overheating and Insufficient Cooling
High operating temperatures can contribute to graphics instability, particularly when cooling performance has deteriorated. Dust accumulation, restricted case airflow, malfunctioning fans, and poor heatsink contact can prevent a graphics card from maintaining its intended operating conditions.
The timing of the problem provides a useful clue. If visual corruption appears after several minutes of gaming rather than immediately after launching a game, thermal instability becomes worth investigating. The same issue may disappear temporarily after the graphics card cools down.
Check the available GPU temperature sensors instead of relying on a single universal temperature threshold. Different graphics cards have different thermal specifications, and GPU core, hotspot, and memory temperatures are not interchangeable. Compare readings against the manufacturer’s limits for the specific model.
3. Power Delivery and Driver Instability
A graphics card requires stable power to operate correctly under demanding workloads. A loose PCIe power connector, unsuitable PSU, damaged cable, or failing power supply can contribute to instability when GPU power consumption increases.
Power-related problems frequently appear alongside other symptoms, including driver timeouts, game crashes, black screens, unexpected restarts, or complete system shutdowns. Artifacting alone does not prove that the PSU is responsible. Check the complete power configuration before considering replacement.
Graphics drivers provide another possible explanation. An incompatible update, corrupted installation, or game-specific driver issue can produce visual corruption that resembles a hardware problem. If artifacts started immediately after a driver update and occur in only one application, software compatibility deserves attention before hardware intervention.
4. What Doesn’t Help
Repeatedly running demanding stress tests is not a sensible response when a graphics card already displays serious corruption. Additional load may increase temperatures or expose existing instability without identifying the underlying cause. Stop testing if the system repeatedly shuts down, smells unusual, or shows signs of physical damage.
Avoid increasing GPU voltage, raising the power limit, or applying another overclock to compensate for instability. These changes can increase electrical and thermal demands while making diagnosis more difficult.
Likewise, reinstalling Windows should not be the first troubleshooting step. A complete operating system reinstall introduces unnecessary work when a driver rollback, stock clock configuration, or cable inspection may identify the problem.
How to Fix GPU Artifacting Under Load: Step by Step
The safest troubleshooting approach starts with free inspections and reversible software changes. Record when the corruption appears, whether it affects multiple applications, and whether it remains visible in screenshots. Then investigate temperatures, tuning, drivers, and power connections in a controlled order. Change one variable at a time so the results remain useful.
Step 1. Identify the Type and Location of the Artifacts
Start by determining whether the corruption originates inside the rendered image or somewhere in the display connection. Take a screenshot when the problem occurs and inspect that screenshot on another device if possible.
If the visual corruption appears in the screenshot, the problem may involve rendering, the GPU, or its driver. If the screenshot looks normal but the monitor still displays flashing lines or unusual colors, investigate the cable, monitor, display port, and signal configuration.
Also compare several workloads:
-
The Windows desktop.
-
A game with relatively low graphics requirements.
-
A demanding 3D game.
-
Another graphics-intensive application.
-
The BIOS or UEFI interface, if corruption appears during startup.
Artifacts across multiple applications are more concerning than a problem limited to one game. Corruption visible before Windows loads also makes a Windows driver problem less likely, although the display chain and graphics hardware still need examination.
Step 2. Restore GPU Settings and Check Temperatures
If you use MSI Afterburner or manufacturer-provided tuning software, return GPU core clock, memory clock, voltage, and power settings to their original configurations.
Do not assume that a previously stable overclock remains reliable under every workload. Memory overclocking is particularly relevant when the symptom consists of flashing textures, colored blocks, or corrupted geometry.
Next, monitor the graphics card during a normal gaming session. Depending on the GPU model and available sensors, useful readings include:
-
GPU core temperature.
-
GPU hotspot or junction temperature.
-
VRAM temperature, when exposed.
-
GPU clock speed.
-
Fan speed.
-
GPU power consumption.
Compare these readings with the manufacturer’s specifications for your exact card. If temperatures approach the applicable thermal limits, inspect dust filters, fans, heatsinks, and case ventilation.
Reduce graphics workload temporarily if necessary. If the problem disappears, that provides a useful diagnostic clue, but it does not establish that the hardware has been repaired.
Step 3. Update or Roll Back the Graphics Driver
Driver troubleshooting is especially important when GPU artifacting under load begins after a graphics driver update, Windows update, or game patch.
For Windows 11, open Device Manager, expand Display adapters, right-click your graphics card, and select Properties. Open the Driver tab to check the installed driver information.
If the problem started after a recent driver update, select Roll Back Driver when that option is available. Restart Windows and repeat the same workload.
If there is no relevant previous driver, download a compatible release from the official NVIDIA or AMD support channel. Follow the manufacturer’s installation instructions and check the release notes for relevant known issues.
AMD also provides an AMD Cleanup Utility for situations requiring removal of existing Radeon software before reinstalling the driver. Use manufacturer-supported procedures rather than downloading unknown driver-cleaning programs.
A clean driver installation is not automatically necessary for every visual problem. Start with the least disruptive option and avoid changing multiple driver settings simultaneously.
Step 4. Inspect GPU Power Connections and Hardware
If the previous steps do not resolve the issue, inspect the graphics card’s physical installation and power connections.
Shut down Windows, switch off the PSU, disconnect the power cable, and allow the system to power down before opening the case. Never disconnect GPU power cables while the computer is running.
Check whether:
-
The graphics card is properly seated in its PCIe slot.
-
PCIe power connectors are fully inserted.
-
Power cables show visible damage or discoloration.
-
GPU fans are obstructed by dust or cables.
-
The graphics card has excessive dust accumulation.
-
The PSU connections match the GPU manufacturer’s requirements.
For GPUs using 12V-2×6 or 12VHPWR connectors, follow the manufacturer’s connector installation and cable-bending guidance. Do not force a connector or use an incompatible adapter.
If the problem continues, a qualified technician can inspect the GPU, PSU, and motherboard. A known-working compatible PSU or graphics card can help isolate the faulty component, but component swapping should only be performed when the necessary compatibility and power requirements are understood.
Diagnostic Table: Troubleshooting Order
| Step | Where | How to Verify | Cost |
|---|---|---|---|
| Inspect artifacts | Screenshot and another display device | Compare captured image with monitor output | Free |
| Restore stock settings | MSI Afterburner or GPU software | Repeat the original workload | Free |
| Monitor temperatures | GPU monitoring software | Compare readings with model specifications | Free |
| Update or roll back driver | Device Manager and official GPU software | Repeat the affected game or application | Free |
| Inspect cooling | PC case, GPU fans, and dust filters | Check airflow and fan operation | Free |
| Inspect power connections | GPU and PSU connectors | Check seating and visible damage | Free |
| Professional diagnosis | Qualified repair service | Component-level inspection and compatibility checks | Varies |
The table provides a diagnostic sequence rather than a list of guaranteed repairs. If the problem disappears after one change, repeat the original workload under comparable conditions before deciding whether the issue is resolved.
FAQ
1. Does GPU Artifacting Under Load Mean My Graphics Card Is Dying?
No, GPU artifacting under load does not automatically mean the graphics card is permanently damaged. Driver problems, unstable overclocks, overheating, and power delivery issues can produce similar symptoms.
However, persistent corruption across multiple applications at stock settings increases concern about hardware failure. Artifacts that appear before Windows loads are another reason to investigate the physical GPU and display chain.
If the graphics card continues producing corruption after basic troubleshooting, contact the manufacturer or a qualified repair technician.
2. Can Overheating Cause Colored Squares and Screen Distortion?
Yes, excessive temperatures can contribute to graphics instability and visual corruption. GPU core, hotspot, and VRAM temperatures should be considered separately because they represent different parts of the graphics card.
Inspect the cooling system for dust accumulation, obstructed airflow, and malfunctioning fans. Compare available sensor readings against the specifications for your particular graphics card.
Do not immediately replace thermal paste or thermal pads. Disassembling a GPU can introduce additional risks, and thermal materials must be appropriate for the specific model.
3. Can a Weak PSU Cause GPU Artifacting During Gaming?
Yes, unstable or inadequate power delivery can contribute to graphics instability, although artifacting by itself is insufficient evidence of a PSU problem.
Check the PSU model, rated capacity, required GPU connectors, cable condition, and manufacturer power recommendations. Also consider whether crashes, black screens, or unexpected shutdowns occur alongside the visual corruption.
Replacing the PSU should follow a diagnosis rather than assumptions based on GPU wattage alone.
4. Should I Replace My GPU If Artifacting Continues?
Consider professional GPU repair or replacement when visual corruption persists at factory settings across multiple workloads after reasonable driver, cooling, and power checks.
Before spending money, check the graphics card’s warranty status and contact the manufacturer about available service options. Avoid disassembling the card if doing so could affect warranty coverage.
A technician may identify a repairable cooling, connector, or power-related issue. If the GPU has damaged VRAM or another failing component, replacement may be more practical depending on repair cost and warranty coverage.
Final Thoughts
GPU artifacting under load requires a systematic diagnosis rather than immediate hardware replacement. Start with stock settings, temperature monitoring, driver checks, and power connections before considering professional repair. If corruption persists across multiple applications, stop unnecessary stress testing and arrange a qualified GPU inspection.