🛒 Best Price Today on Amazon
Prime members get fast, free shipping on everything above, plus member-only deals. New members get a 30-day free trial — cancel anytime.
If you are running out of space for new games, how to upgrade ps5 ssd storage starts with choosing a compatible M.2 NVMe drive. The PS5 supports internal storage expansion through a dedicated slot, allowing you to install and play PS5 games without relying on external USB storage for active gameplay.
Quick answer: Our top pick in 2026 is the Setting — our #1 rated choice. See the full ranked comparison, alternatives and buying advice below.
What a PS5 SSD Upgrade Really Comes Down To
Upgrading PS5 storage means adding a compatible M.2 NVMe SSD to the console’s expansion slot, not replacing its built-in system drive. The additional drive can store, download, update, and run compatible PS5 and PS4 games. Choosing the correct interface, physical dimensions, and cooling solution matters more than buying the fastest drive advertised.
Choose a Compatible M.2 NVMe SSD
Sony specifies a PCIe Gen4 x4 NVMe SSD with an M.2 Key M connector for the PS5 expansion slot. Supported capacities range from 250GB to 8TB. M.2 SATA drives are incompatible, even when their shape resembles that of a supported NVMe drive, so check the interface before purchasing.
A sequential read speed of at least 5,500MB/s is recommended by Sony. This is a compatibility guideline rather than a promise that every game will load identically to the console’s built-in storage. Review the manufacturer’s specifications and confirm that the exact drive model is suitable for PS5 use before ordering.
Check Capacity and Physical Dimensions
Consider how many games you keep installed and how much space their updates and downloadable content require. A larger SSD reduces the need to move games between drives, but the PS5 does not require an 8TB model. Select a capacity that fits your library and budget rather than paying for storage you may not use.
Sony supports M.2 sizes 2230, 2242, 2260, 2280, and 22110, with a maximum width of 25mm and total thickness of 11.25mm, including the cooling structure. The available length must match the mounting position. Check the assembled drive’s dimensions, not just the bare SSD’s measurements.
Plan for Heat Dissipation
An M.2 SSD needs an effective cooling structure, such as a heatsink and heat-transfer sheet. Some drives include a factory-installed heatsink, while others require a compatible one purchased separately. A heatsink that exceeds the console’s dimensional limits can prevent the expansion-slot cover from closing correctly.
If your SSD already has a suitable integrated heatsink, do not add another on top. Extra layers can interfere with the intended thermal design and physical clearance. Before installation, check whether the manufacturer’s cooling assembly fits your specific PS5 model and whether its design leaves room for the expansion-slot cover.
Understand What the Upgrade Changes
Adding an SSD increases available game storage without requiring you to delete games every time you install a new release. You can also choose the M.2 drive as the installation destination for new downloads. This is particularly useful for players who regularly switch between several large games.
The upgrade does not increase the console’s graphics performance or guarantee shorter loading times. Its primary purpose is to expand storage while allowing compatible games to run from the added drive. If you are mainly looking for a place to archive games, a USB external drive may be a less expensive alternative.
What Doesn’t Help
Buying an SSD based only on its advertised peak speed is not a reliable way to ensure compatibility. A PCIe Gen5 drive, an M.2 SATA model, or a heatsink that is too large can create avoidable problems. Confirm the interface, dimensions, cooling arrangement, and manufacturer’s PS5 compatibility information first.
External USB storage also serves a different purpose from an installed M.2 drive. PS5 games can be stored on compatible USB extended storage, but they must be copied to console storage or supported M.2 storage before they can be played. If your goal is to play games directly from the additional drive, choose an eligible internal M.2 SSD.
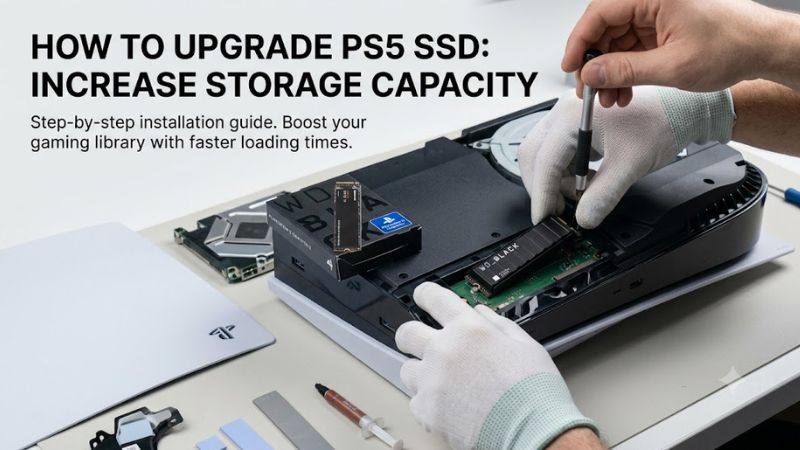
How to Upgrade PS5 SSD: Step by Step
Before opening the console, update its system software, shut it down completely, and disconnect every cable. Allow the console to cool, prepare a clean, well-lit workspace, and use a Phillips #1 screwdriver. Touch a grounded metal object to discharge static electricity before handling the SSD or working near the expansion connector.
| Setting | Where | Effect | Risk |
| System software | Settings > System > System Software > System Software Update and Settings | Helps prepare the console for compatible storage expansion | An interrupted update may cause software problems |
| SSD mounting size | Expansion slot and mounting spacer | Aligns the drive with its screw position | Incorrect placement may damage the connector |
| Cooling structure | On the SSD before installation | Helps dissipate drive heat | Excessive dimensions can prevent the cover from closing |
| Drive formatting | On-screen setup after startup | Prepares the SSD for console storage | Erases data already on the selected drive |
Step 1: Prepare the Console and Workspace
Turn off the PS5 completely rather than leaving it in Rest Mode. Disconnect the power cable and other connected devices, then allow the console to cool. Place it on a stable surface with a soft protective covering to reduce the chance of scratching the exterior while removing the appropriate panel.
Keep the SSD, its cooling structure, and a Phillips #1 screwdriver nearby. Consult Sony’s instructions for your exact console model before removing the cover, because the original PS5 and newer slim models use different panel-removal procedures. Never work inside the console while it is connected to power.
Step 2: Open the Expansion Slot
Remove the appropriate exterior panel according to the model-specific instructions, then locate the rectangular expansion-slot cover. Remove its retaining screw and lift away the cover. Keep the small screws somewhere secure so they cannot roll away or become mixed up with other hardware.
Remove the mounting screw and spacer, then position the spacer in the groove corresponding to your SSD’s length. The available mounting positions accommodate the supported M.2 form factors. Do not force a spacer or drive into position, and check the manual if the slot layout differs from the instructions you are following.
Step 3: Install and Secure the SSD
Hold the M.2 SSD by its edges, align its connector notch with the slot, and insert it diagonally upward until it is fully seated. Lower the drive onto the correctly positioned spacer and secure it with the retaining screw. The board should sit properly against the spacer without being obstructed by the heatsink.
Reattach the expansion-slot cover and exterior panel. If the cover does not close properly, stop and check the cooling assembly’s dimensions and placement instead of pressing the panel into place. A properly fitted SSD should be secure without excessive force, and all covers must be restored before powering on the console.
Step 4: Format the Drive and Verify Storage
Reconnect the cables and turn on the PS5. If the installed SSD has not been prepared for use, follow the on-screen formatting instructions. Formatting erases the selected drive’s existing data, so verify that the correct drive is being prepared and back up anything important beforehand.
Once formatting finishes, open Settings > Storage > M.2 SSD Storage to check the available capacity. You can select Settings > Storage > Installation Location to choose where new games are installed. Move an existing game through Game Library by highlighting it, opening the Options menu, and selecting Move Games and Apps.
After Installation: Manage Games and Troubleshoot Storage
A successful installation should make the new drive appear in the console’s storage settings. If it does not, turn the console off before inspecting the installation again. Check that the SSD is fully seated, its mounting screw is secure, and the drive meets Sony’s interface and dimensional requirements. Do not repeatedly force the connector or attempt to format an unrecognized drive.
If a game performs unexpectedly from the added storage, first pause active downloads and allow any disc-based installation to finish. If the issue continues, move the affected game to the console’s built-in SSD and compare its behavior. Sony notes that game performance can vary between supported M.2 drives, even when their advertised sequential read speeds exceed the recommendation.
Frequently Asked Questions
Can you upgrade the PS5 SSD without replacing the original drive?
Yes, you can add a compatible M.2 NVMe SSD through the dedicated expansion slot while keeping the original system storage. This adds capacity rather than replacing the built-in drive, and you can manage games across both storage locations through the PS5 settings.
What SSD capacity does the PS5 support?
The PS5 supports compatible M.2 NVMe SSDs from 250GB to 8TB. Your usable capacity will be lower than the advertised figure because storage formatting and system requirements affect available space, so consider your game library before choosing a drive.
Do you need a heatsink for a PS5 SSD?
Yes, Sony requires an effective heat-dissipation structure, such as a heatsink and heat-transfer sheet, for an installed M.2 SSD. Choose a drive with an integrated heatsink or add a compatible cooling solution that stays within the console’s size limits.
Can you play PS5 games directly from an upgraded SSD?
Yes, compatible PS5 games can be installed and played directly from the added M.2 SSD. This differs from USB extended storage, which can hold PS5 games but requires you to copy them back to console or M.2 storage before playing.
Final Thoughts
Learning how to upgrade ps5 ssd storage is straightforward when you confirm compatibility, prepare the console safely, and follow the installation instructions for your model. Choose a suitable PCIe Gen4 NVMe drive with adequate cooling, format it carefully, and verify its capacity in Settings before moving your game library.
Ready to decide? Our #1 pick for 2026 is the Setting.
Live price & availability on Amazon.